Spineless Chaya (Cnidoscolus chayamansa)

Description

Spineless chaya, Cnidoscolus chayamansa, is another highly nutritious perennial ‘tree spinach’ (not to be confused with the closely related spiny chaya, Cnidoscolus aconitifolius). This productive plant can reach heights of over 12 feet, is fairly fast growing and requires very little attention. The abundant leaf matter is high in protein, calcium, iron, and vitamins A and C. It is commonly consumed fresh/cooked, but can also be dried and stored for use as a dietary supplement for humans and animals. This plant thrives in dry tropical regions, but with a little care, can also be grown in very wet places.

Propagation

Spineless chaya is typically grown from cuttings. In its native habitat, it allegedly produces seeds. However, I have never heard of that happening here.

Take a slightly woody stem cutting and remove it from the parent plant. Remove all but the top leaves and allow the cutting to dry out a few days. The cut/sap will callous, and prevent it from rotting from the bottom of the stem. I’ve found it’s best not to remove the top part of the cutting and to only utilize cuttings with growing tips still attached. This prevents rotting from the top down. Once dried a few days, proceed to stick it into the ground!

Remove leaves but retain growing tip. Allow to dry/callous and proceed to plant!

Care

Spineless chaya can be grown in part shade or full sun. Plants grow slowly at first and begin to grow rapidly once the hottest months come around. This plant is basically pest and carefree.

Eating

Boiling or frying are the main cooking methods. Chaya leaves contain hydrocyanic glycosides; make sure to cook leaves for at least five minutes to remove toxins. While this specie can technically be eaten raw, toxin tolerance will vary depending on the individual. Therefore, it’s probably best to keep raw leaf consumption to a minimum. New shoots are also cooked and eaten as a vegetable.

Where to obtain planting materials

This plant is very easy to find within Big Island gardening communities. Ask a friend for a cutting!

My Garden

I’ve grown this plant for a few years now, but it’s taken me awhile to figure out the best way to propagate because of its tendency to rot out. With my newest technique described above, I’m finally starting to spread it around. I haven’t had the most productive plants grown here but I have a few friends in nearby places with huge chaya plants. It is persistent, but I haven’t seen its full growth potential at my site. It is a pretty plant, though!

Spineless Chaya grown with: ti, kalo, sissoo spinach, okinawan spinach, cosmos, edible hibiscus, kava, Cuban oregano, orange, and coconut

Happy Gardening!

Mitsuba (Cryptotaenia japonica)

Description

Mitsuba, Cryptotaenia japonica, or Japanese parsley/Japanese honeywort, is a perennial shade-loving herb. It has a taste somewhat reminiscent of parsley/celery. Mitsuba grows up to two feet tall, with a clumping habit formed by short rhizomes and thick roots. Most parts of the plant are edible: the leaves, stems, shoots and seeds. The leaves smell wonderful to brush against and have a beautiful appearance.

Propagation

Mitsuba grows from seed; however, I’ve never seen my plant produce flowers.

Plants may easily be divided as well.

Care

Mitsuba is carefree. Plant in part shade and watch it grow! Regular fertilizing will promote vegetative growth.

Eating

The leaves/stems are used fresh or blanched/parboiled and used in various dishes: pickles, soups, salads, stir fried, or fried. Leaves become somewhat bitter with too much cooking, so cook them quickly or add them as a garnish. The roots are typically fried.

Where to obtain planting materials

This one is a little bit more difficult than most. I’ve never seen the plant or seeds for sale on island. I got a small plant from a friend who got that from a friend. It is around, and I’ve seen it for sale on some seed catalog websites. From my readings, this plant is highly valued in Japanese cuisine; maybe tap into their community to find the plant.

My Garden

I’ve been growing this plant for a little while now and I always use it as a parsley replacement in recipes or when I want a similar flavor. My plant is just now vigorous enough to divide and create more plants. It’s nicely nestled into my herb garden where the leaves make me stop and stare whenever I see it. In the same bed, I’ve been letting my crotalaria spp. (rattlepod) grow like crazy to propagate and gather seeds; luckily for mitsuba, it loves living under the shade this provides!

Happy Gardening!

Bush Mint (Satureja viminea)

Description
Bush Mint, satureja viminea, or Jamaican tree mint, is a perennial tiny leaf mint relative with a large stature and a very potent spearmint flavor. Bush mint reaches heights of six to eight feet with a woody stem, and is delicious as a mint replacement. Apparently, this plant is used in a cool healing bath once processed lightly as well. It also produces abundant little white flowers seasonally. What a pretty plant!

Propagation
Bush mint grows from seeds and cuttings. It is a little difficult to propagate, so in anticipation of that, try to start a lot of plants at once.

Care
Bush mint is a carefree plant. Prune to desired shape and fertilize when needed. This plant grows better than all other mints I’ve tried. Prefers full sun or part shade.

Eating
I have switched from growing and eating other mints because this mint has upright leaves meaning it never comes in contact with the soil, I go for the higher leaves to prevent slug contact as well. I usually only eat tender new leaves as the plant produces so much leafy matter there’s no reason to go for older leaves. I use this mint in teas, soups, salads, and curries. Yum!

Where to obtain planting materials
This plant is a little bit more difficult to find. I’ve only seen it for sale a couple of times. However, quite a few people are growing it so if you come across them ask for a handful of cuttings to try and propagate.

My Garden
I discovered this plant about a year ago and I got a little keiki from a friend. This plant was only a few inches tall and now it’s over four feet. I constantly prune it as I harvest to keep it right around that height. It seems to just flush out and flush out; the plant flowered for about two months and now it’s back in grow mode. This plants habit works wonderfully in an herb spiral or an herb garden; a lot of other herbs are
lower ground growers and this one sprawls upward, creating different canopy layers within your mini garden. Canopy stratification is important for plants to grow well together; they can fill all available niches to prevent unwanted plants from growing. They also protect each other from winds, intense sunlight and heavy rainfall, which are all quite abundant here!

Herb Spiral: Bush Mint, Chives, Garlic Chives, Mitsuba, Vietnamese Coriander, Stevia, Society Garlic, Culantro, Tansy, Ko’oko’olau, Pineapple Sage, Plantain, Cosmos and Crotolaria

Happy Gardening!

Hawaiian Cocktail Pepper (Capsicum chinense)

Description

The Hawaiian Cocktail Pepper, Capsicum chinense, is a highly productive perennial sweet bell pepper. The peppers start green and turn to deep red (sometimes yellow) as they ripen. From my observations, this is a hot pepper that has been domesticated to no longer produce the heat; when you open a pepper you get that scent of heat but no bite when you eat them. These pepper plants can live about two years and grow 2-3’ tall and 3-4’ wide.

Flowers

Fruits

Growth Habit

Propagation

The Hawaiian Cocktail Pepper, like most peppers, is grown from seed. To harvest a pepper for seed, I allow some of the largest peppers on the plant to stay on the plant until the peppers have slightly shriveled. Then, I will open it up, eat it, and save the seeds for planting. Check out the seed propagation blog for more info on starting seeds.

Rumor has it that this pepper will grow from cuttings and can potentially be grafted onto other rootstocks. I do not have any experience with this, yet.

Care

These are very carefree pepper plants. Grow in some shade, full sun, out of the rain, or in full rain. Regularly harvest peppers for stimulation of the plant. Cut off dead branches and occasionally you can give it a heavy pruning, leaving just a couple of main branches.

Heavy prune: cut off woody branches and keep that bright green branch in the middle

Eating

Harvest at any stage of ripeness; I usually wait for a least a little color to appear on the skin, You can leave them on for quite a long time and they will slowly wrinkle; at this stage they are still edible. Just don’t allow them to go soft or you will miss your window to eat them.

Where to obtain planting materials

Get fruits from a friend growing this plant, or keep your eyes open at the farmers’ market; I see these peppers sold all the time. That’s where I got my original seeds.

My Garden

I’ve grown this pepper for a few years now; at this point most of my seeds are from my own plants, I did recently get some new genetics mixed in when I got a handful of peppers from a friend. You’ll always want to bring in new genetics periodically so your plants do not weaken. I also recently acquired a yellow variety of this same plant (very exciting)! During the eruption my little potted pepper plant was hiding in my sun-house. This plant did not get watered for five months and survived regular doses of sulfur in the air. This pepper plant continued to produce for part of the eruption and when I moved back into the property, the plant was here waiting for me full of flowers. This is the plant in all of my photos for this entry. The plant is loaded with peppers (for the second time since September) and continues to flower and keep on going. What an amazingly hardy little plant. I shall continue to collect and spread these genetics.

The pepper that survived the eruption

Happy Gardening!

Litte Fire Ant (Wasmannia auropunctata) Prevention and Protocol

This blog entry is intended for Hawaii residents to prevent new introductions of an invasive specie onto your property.

Description

Little Fire Ant (LFA), Wasmannia auropunctata, is an invasive ant with a nasty sting. LFA are small, fully red, slow moving and live in trees. They do not swarm and they only sting when they get roughed up. While they are not super painful, multiple stings will leave welts and itchiness for a few days. No ants are native to Hawaii and all cause harm to the native ecosystem. However, LFA cause harm to us humans as well, they can and should be controlled around your home.

Typical LFA activity on a potted plant

LFA do not spread very far from their nest. So most nests will be brought onto your property by human activities of moving around materials. Maybe in a potted plant or other plant materials. Check all materials brought into your yard before spreading them.

This is important to note. Worker ants do not start new nests. Only a queen will start a new nest by laying a new queen, this new queen will travel very close to the original nest and start her new nest. Queen and worker ants look quite different, and you will usually see eggs where there is a nest and a queen. So only moving a nest can create a new nest. Not moving individual worker ants.

I highly recommend taking a free LFA workshop from Big Island Invasive Species Committee to learn more information from the experts (http://www.biisc.org/lfa/).

Survey

First thing to know is if you have LFA or not. You will need to survey multiple places in your yard to see if or where they have nests. They prefer trees and shaded moist areas. Look at BIISC website for more details (http://www.biisc.org/surveying-for-lfa/).

  • Use a chopstick, coffee stirrer, stick, pencil, anything that you can stick somewhere and can remember what it looks like
  • Spread a thin layer of peanut butter on the stick (LFA love the protein and sugar content of peanut butter)
  • Poke them into crevices on trees, bananas, ti, near shrubs or into grass
  • Wait 30 minutes
  • Check sticks to see if LFA are crawling around near the peanut butter
  • If you cannot identify them as LFA check website above for confirmation details
  • Note locations where infected sticks were found

Survey all soils, mulches, cinders, composts, tree materials (including posts and logs), firewood, potted plants, cuttings, grafts, air-layers, literally everything, before moving them around your site. 

Chopstick with smeared peanut butter

LFA Found

Quarantine Potential Infection Points

It only takes a few minutes to survey materials at the entrance of your property. This will prevent nest from entering! Once the survey is completed you can proceed to deal with the outcome of your survey. To learn about chemical products for treatments and prevention check out http://www.biisc.org/types-of-products-to-control-lfa/. Amdro and Tango both work as a chemical control.

Non-Pesticide Method For Prevention

Soapy water will drown the ants. The soapy water breaks down the exoskeleton of the ant and deteriorates their floating/waterproofing abilities. When I bring new materials into my yard, I soak them all in soapy water for 15-30 minutes to reduce risk of bringing in new nests.

I also follow this process before I transplant a potted plant into the ground. That way I’m not spreading a nest to an uninfected part of the yard.

Protocol:

  • 5 gallon bucket with ~ 1 gallon of water
  • 1 teaspoon of soap. Any dish soap will do, but make sure it isn’t ‘ultra’ as that could harm your plants. I use Dr. Bronner’s soap.
  • Stick your whole plant into the solution, soil and all. Make sure there is enough water to completely cover the whole pot.
  • After 15-30 minutes, remove the plants and run water through the pot to wash out any excess soap. (If transplanting I look at root ball to make sure no more ants are moving)

3 gallon water: 3 teaspoons soap

Plant soaking in sudsy solution

Larger scale soaking. Sudsy water

Soak plants as much as possible

Rinse out soapy water

Keep the ratio at least 1 gallon of water: 1 teaspoon soap. So 3 gallons of water would be 3 teaspoons or 1 tablespoon of soap. When doing larger containers just make sure the water stays sudsy during the soaking.

This also prevents spreading other pests around too.

Conclusion

I’ve been using this method about two years now and I haven’t spread any ants around to uninfected parts of the property. This process does work! I also soak everything before I give plants away including cuttings and I have never given anyone fire ants. If everyone were to follow this easy protocol we could greatly reduce the spread of these little ants!

This makes for much more happy gardening!

Heart of Palm (Cocos nucifera)

Description

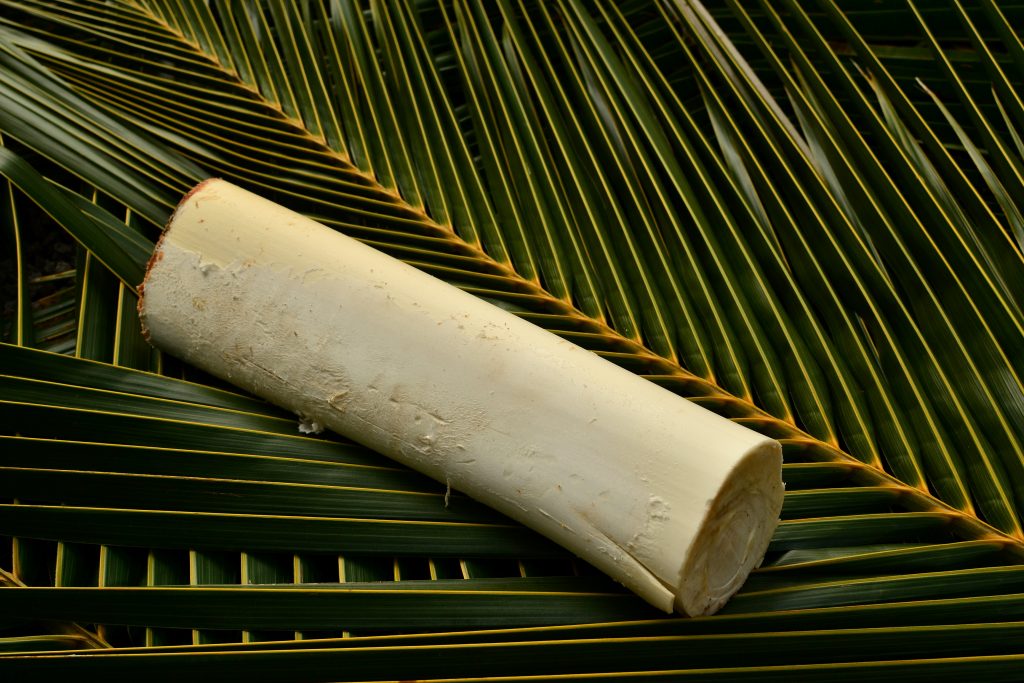
Heart of palm is a well-known vegetable taken from the terminal bud (youngest leaf shoots) from many different palms. This entry will focus specifically on the coconut tree (cocos nucifera); however, most palms can be processed the same way. Taking the heart of palm does kill a coconut tree, so please only cut down a coconut if it is in an undesired location, like too close to the house. Other species grown for heart of palm generally have a different growth habit and a single plant will produce multiple trunks, which can be harvested without killing the entire plant. Taking the heart out of the palm is a lot of work, but the younger the tree the easier it will be. This was the first time I’ve processed heart of palm and I very quickly realized this is my new favorite vegetable! It is so versatile!

DSC_0754DSC_0786DSC_0754

Propagation

Coconuts are grown from seed. Literally place an unopened coconut on the ground. Give it time.

You can grow them in a patch and let them grow for a year or two and come in and harvest the palm of the really young trees. That way you’re growing them for their hearts and you don’t need to allow them to have the space they need as full mature trees.

Harvesting

Never cut down a coconut in the wild or on someone else’s private property. Coconuts are the tree of life and have more uses for humans than any other plant on the planet. These are very very special and important trees. With that being said, if the palm endangers or is in the wrong place, go ahead and work it. The smaller the tree the safer and easier it is to work with. Do not take on this project with a large palm if you don’t have the capabilities of using a chainsaw. Coconuts are dense and hard to work; a handsaw just won’t work for the trunk (I tried). Heart of palm is very perishable. Work the palm quickly and efficiently and do not open the heart until you are ready to eat it. It oxidizes immediately. Take it into the kitchen to store it right away and do not leave in the sun. You may refrigerate or freeze fresh once harvested.

This is the section of the palm where the heart is located. The rest of the palm is woody and has older fronds. Cut down the entire trunk and cut off this section to work it separately.

DSC_0760ee

CIMG4469

Buck up the rest of the trunk into sizeable pieces and distribute them as borders or around trees for mulch. Utilize fronds however you would like, I mulched them heavily around an orange tree then in areas to suppress grasses. So many uses from this plant!

DSC_0761

Work the heart out of the palm by cutting cross sections of both sides of the heart until you notice a difference in texture and color.

DSC_0764

Bottom Section of HOP

Once you notice the difference, begin to peel off the sheaths. It’s all edible at this point so begin trying pieces to determine if it’s bitter or not. If it is bitter, peel off another sheath and get down another layer. Try it again and see from there. Once you have gotten past the bitter part and into the delicious sweet heart you’re ready to bring it inside.

DSC_0774

Slice lengthwise to take off layers

DSC_0775

keep on going

DSC_0776

now you can begin to taste for bitterness

Now you see why heart of palm has such a high value, it is a lot of work and does kill certain palms.

Eating

Heart of palm may be eaten raw or cooked. This is where things get really interesting. I found that there are a few different pieces and textures within the heart. The main part people eat is the small cylindrical very center. But I really enjoy the larger chunks outside of this portion that come along with it. These remind me of fish fillets. Even when you cook them, we broiled them and added a little lemon and it was literally like eating a piece of white fish. We made ‘crab cakes’, ‘ceviche’, ‘mashed potatoes’ and raw salads with it. You can make creamy soups, sauté, pizza, omelets, curries, chutneys and salsas as well.

My Garden

Someone planted coconuts too close to the house. As I’ve lived here, I’ve slowly watched the coconuts get larger and larger. At this point one developed a nice trunk and started leaning toward the house! I knew one day the time would come to cut the tree down before it gets too large and becomes a danger to the house. And of course if you let it get too large, it will grow directly over the house (searching for all that reflective light like the ocean) and drop fronds and nuts on the house. The house would quickly become damaged. I was talking to a friend one day telling him my woes about cutting down the palm. He said, ‘why don’t you eat it?’ That changed it all. So the day came to cut her down. I got a huge heart of palm harvest and now I use the dead stump to tie string for a trellis. The roots of the coconut are now starting to break down and turning the soil into incredibly fertile soils. The coconut used to suck up all the moisture and nutrients from the surrounding beds, now I see the other side of it and the coconut heavily feeding my beds and plants that are directly next to the stump. Allow the nutrient cycling to continue!

DSC_0783

Happy Gardening!

Cassava Processing – Pressure Cooking

Description

Cassava tubers are an incredible, versatile, starchy food source. It is super easy to grow and thrives in minimal and poor soils! Did you know that processing and preparing cassava is just as easy as growing it? There are many ways to prepare cassava; I’ve found this method really straightforward to get it into the kitchen. This method is for pressure cooking cassava and not making flours, starch granules, or ferments. Once cassava is out of the ground the shelf life is really short, so process it as soon as possible. Not to worry when you have a large harvest, it’s easy to store too!

You need to learn the variety you’re growing. Be sure to only dig up the same variety and process it by itself. Don’t mix varieties when you process and cook as they may have different textures and cook times. Variety names do not matter, as I cannot find any information on varieties and cook times, so just stick to your same varieties and learn as you go. I’ve heard on our island we have three varieties: red, yellow and green. But I have at least five distinctly different varieties growing right now, so that shattered that theory. Look at leaf shape, color of stem and leaves, and color of petiole and stipule. Since cassava is typically grown as a clone and not seed, genetic variability doesn’t occur. So these are direct clones someone has cultivated somewhere and it adapted and evolved into separate varieties. In simple: stick to same varieties when preparing and cooking. I like to grow a few plants in close proximity and harvest them all at the same time and re-grow a patch once harvested.

Harvest

Again, you have to learn when your particular variety is ready for harvest, write down when you planted it and write down when you obtain a satisfactory harvest. Different varieties harvest between 6-18 months. You may harvest at specific time depending on the age of tuber you want. I prefer young tubers as you can use them all and not worry about woodiness. So I harvest early.

There are two ideologies when it comes to harvesting cassava. 1. Dig the whole plant up, and 2. Dig a few tubers at a time as needed. I prefer pulling the whole plant up, and pull up multiple plants at once, and have a single large processing batch rather than doing small ones regularly. I like to minimize work and store processed goods to grab and throw together a meal rather than: harvest, process and then cook.

Yank that plant out of the ground! If you’ve prepared soil, it comes out as soon as you pull enough on the main stalk, should be easy to pull up all the roots at once. If you didn’t prepare soil and it’s growing in lava rocks, you’ll have to get down there and move around rocks until you can get the whole thing out.

If you harvest during the week of the full and new moons, the energy of the plants will be in the roots and therefore, create a more nutritious harvest. If you harvest at these times, it is also a good time to propagate as the energy is in the roots and will begin rooting right away. Working with nature!

Post Harvest Processing

  1. Separate stalks from tubers. I mulch the tops of my plants where I harvest, then I take the stalks and stick them in the ground elsewhere to propagate them. Crop rotation is important to prevent pests.
  2. At this stage the tubers should be washed to remove excess soil. Can be done in a bucket or with running water. I’ll usually use a little luffa sponge to scrub if necessary. These skins will be removed so it is not too important.
  3. Next, take washed tuber and cut it into large pieces, there are usually natural breaking points on the tubers, separate at this point and cut off rootlet ends. If whatever tool your using doesn’t cut through the tubers easily, they are woody, not edible, take them and compost them. This is where you’ll need to learn when to harvest your variety. If they are mostly woody then you are waiting too long, harvest them earlier next time. dsc_0721
  4. Grab a knife and slice lengthwise along the whole tuber. You’ll notice the flesh isn’t very thick so you only need to slice that deep.dsc_0730
  5. Stick your finger under the skin at one of the edges, sometimes you may need to use the knife and pry it up.dsc_0732
  6. Slide your finger along the sliced cut along the whole length. Don’t worry the tuber should be nice and juicy and smooth to work with. Turn tuber around the do the same along the other side of the slice.dsc_0733
  7. At this point, you’ll notice the whole skin is coming off in one piece. Continue to work it; it will come off easily in one piece. Compost that nutrient rich skin!
  8. Wash again. Bring them inside. Wow, that was easy!dsc_0750

Kitchen Work

In the kitchen comes the final part of processing. First thing to know: if your knife doesn’t cut through easily, compost it, it’s not worth the frustration!

  1. Cut everything into evenly sized pieces, we usually take one of the smallest roots and use that to size everything (if a tiny outlier exists, its not worth cutting all the larger pieces to that size). The more standardized all the pieces are, the more even the cooking. Tubers are typically cut 3-4 inches long x whatever piece is the average smallest diameter. We prefer to keep cut chunks as large as possible.
  2. When working with them check out the very center of the tuber for woodiness. If you harvest them young there’s nothing to worry about and no woodiness. If woody just cut it out.
  3. Once everything is nice and evenly cut and all woodiness removed, add to pressure cooker.
  4. Pressure cook for 5-8 minutes (dependent on variety). Once time is up, quick release, or pour cool water slowly over top of cooker to cool, so you can release the pressure as soon as possible to stop cook time. The pressure cooker is an important tool and I suggest everyone goes and finds a simple stove top cooker. It is worth it to speed up cook times of our tropical foods. Pressure cooking times starts once pressure regulator is moving and pressure is built, until then it’s pre-heating. You can boil but would probably take 40-45 minutes.
  5. Stick a fork into a cassava piece, fork should enter slowly and fully pierce.
  6. Once cooked take out and allow to dry. Now you have edible cooked cassava! This is your base for all cassava dishes. We typically freeze as much as we can at this stage for quick already processed cassava meals. We freeze them on a baking tray in a single layer and then fill into Tupperware or freezer bags once frozen. This prevents them from sticking to each other as they freeze. Once frozen they won’t stick together. We do the same for our bananas.
  7. From here, fresh or frozen, we make: fries (baked, roasted or fried), hash browns (refrigerate before shredding for best results), throw them in soups, curry, chili or anything really. Now you can utilize them as a potato and use them in any recipe calling for that. This is where cassava gets fun! Tubers do not have too much flavor and benefit from heavy spicing.
    dsc_1207

    Fries: Bake @ 400 degrees for 20-30 minutes. Olive oil, sage, rosemary, salt, pepper

    dsc_0876

    Preserved cassava products: frozen pressure cooked,  frozen hash browns. In jars: puba –  fermented cassava flour

Conclusions

Processing cassava in this manner is easy and accessible for anyone to enjoy this dense and delicious starch. This methodology allows us to use tubers in a certain way, there are other numerous ways to eat and utilize this amazing plant. My favorite method is called puba, take fresh root and mill it into a thick moist ‘flour’. From there you take it and press out all of the liquid. After pressing and it’s fully dry, you take it and press it into jars and allow it to ferment 1-2 weeks. From there you can use it as ‘bread’ and make pizzas and crusts. It’s delicious!!! Cassava is so versatile, now you too can enjoy cooking it up!

Happy Gardening!


Bean Processing

Description

I will describe the process of drying and storing beans for use as dried beans or for seed. This process can be done with any and all beans. I am specifically showing lablab as an example because in my opinion this is the superior bean for a wet climate. Read more about lablab here. Lablab pods dry on the vine even in a wet environment. I’ve left beans on the vine for too long and when I’ve gone out to check them, they haven’t started decomposing and very few pests decide to get in there and eat the beans. This bean will also dry out of the pod during rainstorms and during wet humid weather, when most other beans will turn moldy and start decomposing. These reasons make lablab superior. Then to add on the nitrogen fixing capabilities, the fact that it’s a perennial, super productive, multipurpose as a food source, and the beans store well making dried beans another source of food security. Yes beans!

Harvest

First things first, you’ll need to determine what pods are worth opening up and which you can just use their pods (beans not developed). Turn them to their side to make sure they are bulging and they have beans developed. Feel them! If you accidentally harvest immature pods you may eat them sauteed or steamed, certain varieties raw.

dsc_0660

Bulging pods have beans developed. Mature on left, Immature on right.

Harvest beans when dry or nearly dry on the vine. (Beans will be developed, pods bulging and usually become somewhat translucent as they dry).

Post Harvest Processing

  1. If you have dry weather you can leave the pods a few days in the sun to crisp up. If you have wet weather immediately shell all beans.dsc_0665
  2. Shelling: Take the pod, grab the flatter side and pinch the tip of one of the ends and pull away from the pod, dependent on variety a large string will peel off (hence string beans). dsc_0674
  3. Then apply pressure on the bean pod and it will slightly open, then grab the sides of the pod and pull them apart. The pod will typically open as two halves showing the beans (Just like processing snap peas).
  4. With time you’ll soon discover which pods are the right age to determine the bean you are looking for. I try to only collect dried ‘colored’ beans that have already transitioned away from being green and develop their dried colors.

    dsc_0677

    Notice some matte (dry) and some glossy (still containing moisture)

  5. Open up all beans all put them into a tray, clean as you go if necessary. (very simple tray, make sure you determine the size of your beans and get some metal screen sized so your harvest wont fall through (dont forget, as the beans dry they do shrink). I use wood and some screen and make a simple frame I can put anywhere in the sun). If you had to you could use a baking tray, but its best to have some ventilation all around your drying product.
  6. Leave in the sun and monitor so the rains never come in contact with your drying beans. Periodically come and move around all the beans for even drying. Bring inside at night.

The magic of lablab – at this stage the rains came for two weeks straight. These beans dried perfectly fine in the garage, with ventilation during non-stop rain with no access to sunlight. If weather like this comes you just have to shift around your beans more periodically, and dry times are slower, but the lablab will dry. Other beans I’ve grown have molded during these kinds of weather.

  1. Once beans are fully dry. You can move them around and even toss them together and you will know once they are fully dry, they sound like small pebbles, think of the sound of fresh green peas vs. dry beans. If in doubt allow them to dry longer. If there is any moisture it could spoil your whole batch once it’s stored.
  2. Store them for seeds or to use as dry beans for cooking. I store them in mason jars if I’m going to eat them, and I store them in plastic baggies inside of mason jars in the refrigerator if I will use them for seed. We also tend to dry our beans, cook some of them and store them cooked in the freezer. Creating that feeling of opening up a can of cooked beans without ever having to leave the property. More ways to preserve, and make life a little bit easier when there is easy to grab, quality food, when you don’t have too much time for cooking. Or in my case, too lazy to go to the store.

    dsc_0802

    White Whippoorwill Cowpea – left. Wonder Bean ontop of Thai Soldier Long Bean – middle. Luffa ontop of Lablab – right.

Best Beans for Wet

We got 254 inches (6451.6 mm) of rain in 2018. I need a bean that can handle wet and rainfall at any time. My three favorite beans as of now are ‘White Whippoorwill Cowpea’, ‘Thai Soldier Long Bean’, and Lablab. All of these beans have been super prolific, delicious as a green bean (could be preserved by pressure cooking and canning). They all dry well on the vine, as well as in my post harvest bean processing, and all three make delicious dry beans! When you grow beans like these you have to remember not to plant too many, unless you enjoy the burden of overabundance!

Conclusions

Through this procedure you can establish food security and go full circle with your plants, from seed to seed. Most beans are very prolific and now you can store all those beans that you missed as green beans and have dry beans for soups, chili, bean dip, hummus, tofu, tempeh, bean salad, bean sprouts, or anything bean related. This also allows you to propagate from your plants as well; not only is this insuring future seed security for yourself, but also gives you adapted genetics in your specific microclimate, and well, we know Hawaii is all about microclimates. Grow them, eat them, and share them. I never need to buy beans again!

dsc_0052

Sure is hard to capture a photo during a dimly lit rainstorm in the garage. Lablab dried just fine!

Happy Gardening!


Spiny Chaya (Cnidoscolus aconitifolius)

Description

Spiny chaya, Cnidoscolus aconitifolius, is a highly nutritious, productive, and fast growing perennial tree ‘spinach’ that reaches heights of 20 feet. There are two main cultivated varieties, or species, of chaya. This article focuses on the specific spiny or estrella variety. Although there is some confusion with naming as well, I’m going to stick with this specie as the spiny chaya and the spineless chaya as Cnidoscolus chayamansa, which will have a write up at a later time. Chaya is rich in protein, calcium, iron, carotene, riboflavin, niacin, and ascorbic acid! Once dried and ground it also becomes a great supplement for us humans or for great animal feed. And really, it’s just a beautiful plant!

DSC_0267

That kalo relative is 7′ tall. look at that chaya over story

DSC_0297DSC_0314

Propagation

Propagate spiny chaya by woody cuttings. You may either stick into the soil or just leave large trunk pieces on the ground and they will root. Use cuttings 1-3 feet long.

DSC_0425

Stick 1-3 foot woody cutting into the ground

DSC_0406

cutting just getting going

Care

Spiny chaya is carefree. Stick it into the ground and wait for leaves to emerge and begin consuming! Be mindful of the small hairs on the leaves that cause irritation, so don’t plant this in a high traffic area where you would potentially bump into the leaves on accident.

Eating

Harvest and prepare spiny chaya wearing gloves, to prevent being poked from the spines. The spines disappear with cooking and leaves do not reduce much in size once cooked. Spiny chaya contains toxins in the leaves and must be cooked for 5-15 minutes before consumption to cook out the hydrocyanic glycosides. I have also had a delicious ‘kimchi’ that uses this plant as the only source of greens in the ferment. The leaves are cooked first then cooled and fermented.

Where to obtain planting materials

This plant does not grow from seed; you’ll need to find someone growing this plant to get woody cuttings. This plant is much less common than the spineless chaya that everyone seems to be growing, therefore, it may be difficult to find.

My Garden

I’ve known about chaya as long as I’ve been in the tropics, but I have never had good luck with spineless chaya growing here for some reason. I recently learned about the spiny variety and got to observe its growth habit and consume it while spending some time on the dry side of the island. I brought it over here to see how it grows in the wet environment. So far its growing and putting off a few leaves, they have only been in the ground a little while so they haven’t taken off just yet. I am not able to fully report how it likes the wet, but I’ve read they can handle wet and that it takes them a little time to develop their roots before getting really vigorous. The goal is to grow this around my fruit trees for an easy constant source of mulch for them and an easily obtainable food for me. The waiting game begins!

DSC_0696

One of my cuttings after a pruning/harvest and mulching. Growing with banana, mulberry, sugarcane, ti, and sweet potato.

DSC_0315

Multi-diverse agroforestry with chaya overstory. Including: elderberry, cassava, edible hibiscus, balsa, Alocasia spp., mexican sunflower, tree tomato, bamboo, ginger, turmeric, and i’m sure more!

DSC_0320

Spiny chaya growing to its full potential in a multi-diverse windbreak. Mexican sunflower, bamboo, banana.

DSC_0719

Spiny chaya privacy hedge. Growing to their full potential. Notice the spacing to have a full wall.

Happy Gardening!

Sacha Inchi (Plukenetia volubilis)

Description

Sacha inchi, Plukenetia volubilis, or inca peanut, is a highly productive perennial vine that produces edible nuts and leaves. These nuts are high in protein, oils, and fatty acids omega 3, 6 and 9. Some people call them a superfood. The vine climbs up to about 7’ and tops off. This plant contains toxins in its raw form and must be roasted prior to eating. The nut flavor is slightly peanut like and the leaves may be eaten or drank in tea form after roasting. The fruits are extremely ornamental and always make people stop and look!

DSC_0449

Vine climbing pink trellis

DSC_0444

immature fruits

Propagation

Sacha inchi is propagated by seed. Check out my seed propagation blog. Plants can be grown directly in place or planted in a pot and transplanted once 6 inches tall. Seeds germinate fairly rapidly within a few weeks.

DSC_0492

Direct sow seedling

Care

Sacha grows at a moderate pace and is not overly aggressive. Weed around them and put them on a trellis. Once they get going there is no maintenance. Apparently harvests are typically around 100 nuts and the plant produces nearly year round. Making about 4-5 harvests leaving you with 400-500 nuts per vine per year. The nuts also have an extremely long shelf life if left inside of their shells (at least a year in my experience).

Eating

Sacha inchi flowers 5 months after sowing and nuts are harvestable around 8 months. Allow fruits to fully ripen and dry on the vine, yes even in an extremely wet environment they will dry on the vine. Once they are brown and dry you can pick them off the vine.

Shell them using pliers then roast them. This may be done in a pan as well. I also sometimes throw a few in soup or curry and boil to add some extra nutrients to my meals.

DSC_0468

All Stages of processing: Right – dry harvest. Middle – open shell. White nut- edible part. Brown shell – use pliers to open to get edible white nut.

Where to obtain planting materials

This plant is still a little bit rare here on our island. Ask someone growing it for seeds, as they are so prolific and easy to share.

My Garden

I’ve been growing sacha for just about two years now. I originally had 5 vines growing. Two didn’t make it through the sulfur and lava event but three made it. These plants are just starting to get going once again and are full of flowers and immature fruits. This is just a hardy beautiful plant. It look me a while to figure out how to eat it since there isn’t too much information in that respect out there. And now I recently acquired what I was told was a sacha relative, Plukenetia spp., but as of now looks really similar so I’m not sure if it is a different species yet, but we will see once it starts growing more and flowers. What a fun plant to grow!

DSC_0448DSC_0437

DSC_0486

Sacha relative growing with sissoo spinach


Happy Gardening!